Discussion 8
CMPE691 : Reconfigurable System Design
Dr Ryan Robucci and Saad Rahman
October 17th 2019 October 4,2018;
Objective
- Compile C program on host computer for HPS and run program on embedded system ARM
Part I Setup and Hello World
Tools
- Intel SoC FPGA Embedded Development Suite: Download and install SoCEDSProSetup-18.1.0.222-windows.exe or SoCEDSProSetup-18.1.0.222-linux.run from the provided link : Intel SoC FPGA Embedded Development Suite.
- Terminal Program: e.g. MobaXterm, Putty, minicom
- Optional:
- FileZilla. Download link.
- WinSCP
Create helloworld.c
Native vs Cross Compilation
- Native compilation : When a program is compiled on a system to run on the same architecture as that of the system itself, the process is called native compilation.
- Cross compilation : When a program is compiled on a system to run on a different architecture as that of the system itself, the process is called cross compilation.
We will use cross-compilation to compile the ARM code from our PC.
Create a file on the host computer:
helloworld.c
 #include <stdio.h>
 int main(void){
 printf("Hello World!\n");
 return 0;
 }
Compile C code for HPS
Start Embedded Design Suite Command Shell and Customize environment (my_env.sh):
Windows
Run Embedded_Command_Shell.bat. The default location of Embedded_Command_Shell.bat is C:\intelFPGA_pro\18.1\embedded if you're using version 18.1 in Windows
Your environment including the following tools:
- arm-linux-gnueabihf-gcc
- arm-linux-gnueabihf-objdump
- arm-linux-gnueabihf-size
To customize the environment for your installation, create my_intel_fpga_env.sh on Windows Cygwin (note the use of c: since the arm compiler doesn't seem to like /cygdrive/c):
export LM_LICENSE_FILE=1701@eclipse.umbc.edu
export QUARTUS_ROOTDIR_OVERRIDE=/cygdrive/c/intelFPGA_lite/18.1/quartus
export SOCEDS_DEST_ROOT=c:/intelFPGA_pro/18.1/embedded
source $SOCEDS_DEST_ROOT/env.sh
> source my_intel_fpga_env.sh
Linux
my_intel_fpga_env.sh on Linux:
export LM_LICENSE_FILE=1701@eclipse.umbc.edu
export QUARTUS_ROOTDIR=/opt/intelFPGA_lite/18.1/quartus
export SOCEDS_DEST_ROOT=/opt/intelFPGA_pro/18.1/embedded
source $SOCEDS_DEST_ROOT/env.sh
> source my_intel_fpga_env.sh
Your environment including the following tools:
- arm-linux-gnueabihf-gcc
- arm-linux-gnueabihf-objdump
- arm-linux-gnueabihf-size
Compilation
- Navigate to the folder in which your code is present (
cd). - Compile the helloworld program using the following command:
arm-linux-gnueabihf-gcc helloworld.c -o helloworld, as shown in this figure:

This creates the output file helloworld, which is the helloworld ARM binary executable that we can copy to our Linux microSD card and execute on the DE1-SoC.
Copying the Executable to the SD Card
Create Root Password
This step may be optional. Depending on the boot image you used, it may already have a default root password terasic.
- To send files in the Linux OS running in HPS through a remote terminal, we need to set a password for the
rootuser on the embedded OS. In the embedded OS terminal (e.g. through Putty/minicom) typepasswdand set a desired password.
Network Connection
Use Method 1 or Method 2
Method 1: Network Option Peer-to-peer Network (Windows)
-
Connect and ethernet cable direction from the DE1-SOC board to the host PC
-
Obtain the IP address of the host pc: Open
cmdin your host PC. Runipconfig(ifconfigin linux) and find your 169.254... address lets call it 169.254.ABC.XYZ, you’ll need ABC and XYZ. (This is the IP address of the host) -
Open
Puttyand log in the Linux OS of the HPS. Then typevi /etc/network/interfaces.Find
auto eth0in that file and add/change the following lines to match the following listing. Here we randomly picked 169.254.167.163 to be the embedded system IP address (should not be the same as the host computer) ABC.XYZ are from earlier(IP of host PC)# Wired or wireless interfaces auto eth0 #iface eth0 inet dhcp iface eth0 inet static address 169.254.167.163 netmask 255.255.0.0 gateway 169.254.ABC.XYZ iface eth1 inet dhcpHow to edit using vi? https://www.guru99.com/the-vi-editor.html
type i to enter insert mode to edit
when finished editing hit esc-key to return to command mode then type:wqto write and quit -
. The setting in this file is persistent and will take effect on next boot, but to load the setting immediately you can restart network services in the embedded OS, e.g.
/etc/init.d/networking restart
or
ifdown eth0
ifup eth0
ip a show eth0
Method 2: Network Option Router
- Connect and ethernet cable direction from the DE1-SOC board to the host router
- Run micro dhcp client: udhcpc
root@socfpga:~# udhcpc
udhcpc (v1.20.2) started
Sending discover...
Sending select for 192.168.1.7...
Lease of 192.168.1.7 obtained, lease time 86400
/etc/udhcpc.d/50default: Adding DNS 192.168.1.1
- The example showed obtaining an address of 192.168.1.7
Debugging notes
A quick method to set a temporary IP address is sudo ifconfig eth0 xxx.xxx.xxx.xxx
Test Connection
From the host command prompt ping the IP address and verify the socfpga is reachable
$ping 169.254.167.163
Network File Transfer
Method 1: SCP
SCP should be installed in your windows unix-like enviroment already
- Open
Embedded_Command_Shell.bat. - Navigate to the folder in which your code is present.
- type in this command.
scp <filename> root@<IP address of HPS>:/home/root/. When prompted provide the password for root user (Default password isterasic, but we set it to something else earlier).scpwill securely and directly copy the file in the/home/rootdirectory of the HPS.
Method 2: FileZilla
Open FileZilla. Type the IP address you set in Host , Username should be root type in the password you set and Port should be 22. Then hit Quickconnect

- Then transfer the code and object file into any directory in the Linux OS of HPS.
Executing the code
-
Add execute permissions: in the socfpga OS terminal, navigate (
cd) to the directory in which the code and object file are located. Typechmod 777 <filename>to change the execution (x) permissions.ls -l <filename>will show that execute permissions have been added -
Execute: type
./<filename>to execute the command
-
For more details, download Altera tutorial from here.
Part II
October 17th 2019; October 18,2018
Objective
- Compile C and run code for Custom Component in HPS.
Tools :
By this point you should already have all the required tools installed
- Quartus Prime.
- Platform designer.
- Intel SoC FPGA Embedded Development Suite.
Notes :
- This discussion assumes that you have the enviroment to build hello world:
- In this discussion we used
Intel SoC FPGA Pro 18.1version. Download link.
Create a Makefile:
Makefile (!!!REPLACE <TAB> with actual tabs!!!):
Makefiles require actual Tab characters 0x08 which are difficult to embedded. I placed <TAB> where you should use the TAB key
Makefile: (no extension)
#filename: Makefile
#Ryan Robucci
#Edit the first two lines as needed
#assumes source is main.c
TARGET = custom_component_test
IP = 169.254.167.163
#
ALT_DEVICE_FAMILY ?= soc_cv_av
CROSS_COMPILE = arm-linux-gnueabihf-
#CFLAGS = -std=gnu99 -static -g -pg -Wall  -I${SOCEDS_DEST_ROOT}/ip/altera/hps/altera_hps/hwlib/include -I${SOCEDS_DEST_ROOT}/ip/altera/hps/altera_hps/hwlib/include/$(ALT_DEVICE_FAMILY) -D$(ALT_DEVICE_FAMILY)
CFLAGS = -std=gnu99 -static -g -pg -Wall  -I${SOCEDS_DEST_ROOT}/ip/altera/hps/altera_hps/hwlib/include -Iip/altera/hps/altera_hps/hwlib/include/$(ALT_DEVICE_FAMILY) -D$(ALT_DEVICE_FAMILY)
LDFLAGS =  -g -pg -Wall
CC = $(CROSS_COMPILE)gcc
ARCH= arm
DEPS = *.h


build: $(TARGET)
$(TARGET): main.o
<TAB><TAB>$(CC) $(LDFLAGS)   $^ -o $@
%.o : %.c $(DEPS)
<TAB><TAB>$(CC) $(CFLAGS) -c $< -o $@

.PHONY: clean
clean:
<TAB><TAB>rm -f $(TARGET) *.a *.o *~

scp: build
<TAB><TAB>scp $(TARGET) root@$(IP):
Create a C code file main.c:
This writes 0 to 9 in the custom component's base address using a for loop.
main.c:
//filename: main.c
//Ryan Robucci

#include <stdio.h>
#include <unistd.h>
#include <fcntl.h>
#include <sys/mman.h>
#include "hwlib.h"
#include "socal/socal.h"
#include "socal/hps.h"
#include "socal/alt_gpio.h"
#include "hps_0.h"


//socks

#include <stdio.h>
#include <stdlib.h>
#include <string.h>
#include <unistd.h>
#include <sys/types.h>
#include <sys/socket.h>
#include <netinet/in.h>
#include <netinet/tcp.h>
#include <sys/ioctl.h>

#include <time.h>

#define HW_REGS_BASE ( ALT_STM_OFST )
#define HW_REGS_SPAN ( 0x04000000 )
#define HW_REGS_MASK ( HW_REGS_SPAN - 1 )

// convert 8-digit hex string to uint32_t
uint32_t h2i(char c) {
	uint32_t i = 0;
	switch(c) {
		case '0': i=0; break;
		case '1': i=1; break;
		case '2': i=2; break;
		case '3': i=3; break;
		case '4': i=4; break;
		case '5': i=5; break;
		case '6': i=6; break;
		case '7': i=7; break;
		case '8': i=8; break;
		case '9': i=9; break;
		case 'a':
		case 'A': i=10; break;
		case 'b':
		case 'B': i=11; break;
		case 'c':
		case 'C': i=12; break;
		case 'd':
		case 'D': i=13; break;
		case 'e':
		case 'E': i=14; break;
		case 'f':
		case 'F': i=15; break;
	}
	return i;
}

//convert hex assii string to integer
uint32_t sh2i(char *s) {
    //printf("Calling sh2i\n");
	uint32_t integer = 0;
	uint32_t index=0;
	while (s[index] != '\0') {
	  	integer = (integer<<4) + h2i(s[index]);
		index++;
		//printf(":%d:", index);
	}
    //printf("\nExiting sh2i\n");
	return integer;
}

//convert decimal ascii string to integer
uint32_t sd2i(char *s) {
    //printf("Calling sh2i\n");
	uint32_t integer = 0;
	uint32_t index=0;
	while (s[index] != '\0') {
	  	integer = (integer*10) + s[index]-'0';
		index++;
		//printf(":%d:", index);
	}
    //printf("\nExiting sh2i\n");
	return integer;
}

//convert binary ascii string to integer
uint32_t sb2i(char *s) {
    //printf("Calling sh2i\n");
	uint32_t integer = 0;
	uint32_t index=0;
	while (s[index] != '\0') {
	  	integer = (integer*2) + s[index]-'0';
		index++;
		//printf(":%d:", index);
	}
    //printf("\nExiting sh2i\n");
	return integer;
}

//convert ascii string to integer
//if string has prefix 0x or 0b then the rest of the string is assumed to be hex or binary respectively
//otherwise, a decimal string is assumed
// i = s2i("0xhf")
// i = s2i("0b010110")
// i = s2i("0b921")
uint32_t s2i(char *s) {
	uint32_t integer;
	if (s[0]=='0' && s[1] == 'x'){
			integer = sh2i(s);
	} else if (s[0]=='0' && s[1] == 'b'){
			integer = sb2i(s);
	}else{
			integer = sd2i(s);
	}
	return integer;
}

#define IO_PTR(_BASE) (virtual_base+((unsigned long)(ALT_LWFPGASLVS_OFST+(_BASE))&(unsigned long)(HW_REGS_MASK)))
#define GET_BIT(x,b) (((x)>>(b))&1)

int main(int argc, char *argv[])
{

  void *virtual_base;
  int fd;


  ///////////////////////////////////
  // map the address space for the LED registers into user space so we can interact with them.
  // we'll actually map in the entire CSR span of the HPS since we want to access various registers within that span

  if( ( fd = open( "/dev/mem", ( O_RDWR | O_SYNC ) ) ) == -1 ) {
    printf( "ERROR: could not open \"/dev/mem\"...\n" );
    return( 1 );
  }

  virtual_base = mmap( NULL, HW_REGS_SPAN, ( PROT_READ | PROT_WRITE ), MAP_SHARED, fd, HW_REGS_BASE );

  if( virtual_base == MAP_FAILED ) {
    printf( "ERROR: mmap() failed...\n" );
    close( fd );
    return( 1 );
  }

  //void * ptr_dac_db_14b  =  virtual_base + ( ( unsigned long  )( ALT_LWFPGASLVS_OFST + PIO_DAC_DB_14B_BASE ) & ( unsigned long)( HW_REGS_MASK ) );
  for(int i = 0; i<10;i++){
    *(uint32_t *)IO_PTR(REG32_AVALON_INTERFACE_0_BASE) = i;
    printf("i:%8d, CUSTOM: 0x%8x PIO_FEEDBACK: 0x%8x\n", i,
	   *(uint32_t *)IO_PTR(REG32_AVALON_INTERFACE_0_BASE),
	   *(uint32_t *)IO_PTR(PIO_0_BASE));
  }


  /* End Main Loop */


  // clean up our memory mapping and exit
  if( munmap( virtual_base, HW_REGS_SPAN ) != 0 ) {
    printf( "ERROR: munmap() failed...\n" );
    close( fd );
    return( 1 );
  }

  close( fd );

  return 0;
}
Create Header Files :
-
Copy the
soc_system.sopcinfo(Default location : Your Quartus project directory) from a previously generated sopc, e.g. for the custom component. We will need thesoc_system.sopcinfofile to generate header for our C code. -
Create a helpful script to avoid remebering the command for sopc-create-header-files. The filename should be
generate_hps_qsys_header.shand have the contents belowgenerate_hps_qsys_header.sh:
#!/bin/sh
sopc-create-header-files \
"./soc_system.sopcinfo" \
--single hps_0.h \
--module hps_0
-
Add execute permissions to the script
chmod +x generate_hps_qsys_header.sh -
Run the script
./generate_hps_qsys_header.sh

It will create a header file named
hps_0.hdescribing the memory locations of components. Try to find your custom IP referenced in this file -
Open
Embedded_Command_Shell.bat.The default location ofEmbedded_Command_Shell.batisC:\intelFPGA_pro\18.1\embeddedprovided you installed the 18.1 and Pro edition of Intel SoC FPGA Embedded Development Suite. We need to export the path ofsopc_builderfolder to generate the header file. Considering the default location for Quartus Prime, type inexport PATH=$PATH:/cygdrive/c/intelFPGA_lite/18.0/quartus/sopc_builder/binPlease remember, the path variable may change according to your location of the Quartus Prime software. Use this command if you didn't installed Quartus Prime in the default location.
export PATH=$PATH:/cygdrive/<your install location>/quartus/sopc_builder/bin -
Then, type in
maketo compile the code (main.c). It will create an arm executable namedcustom_component_test.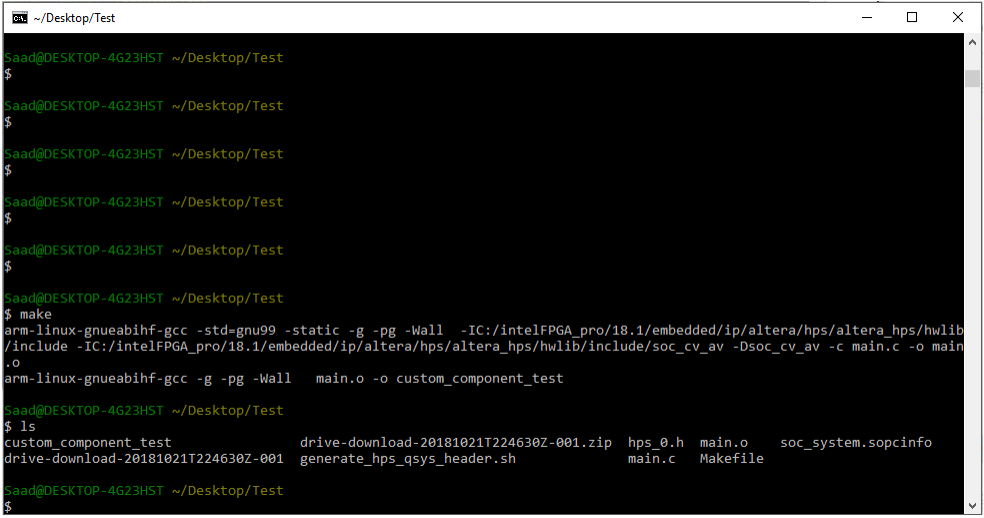
-
Extract the
altera_ip.tar.gzfile from the downloaded folder of step 2, and copy theipfolder over in this directoryC:\intelFPGA_pro\18.1\embedded. This is the default location for Intel SoC FPGA Embedded Development Suite and it may change according to the version you installed.
Use custom component via HPS
- Transfer the executable in the HPS SD Card directory using any of the method described previously
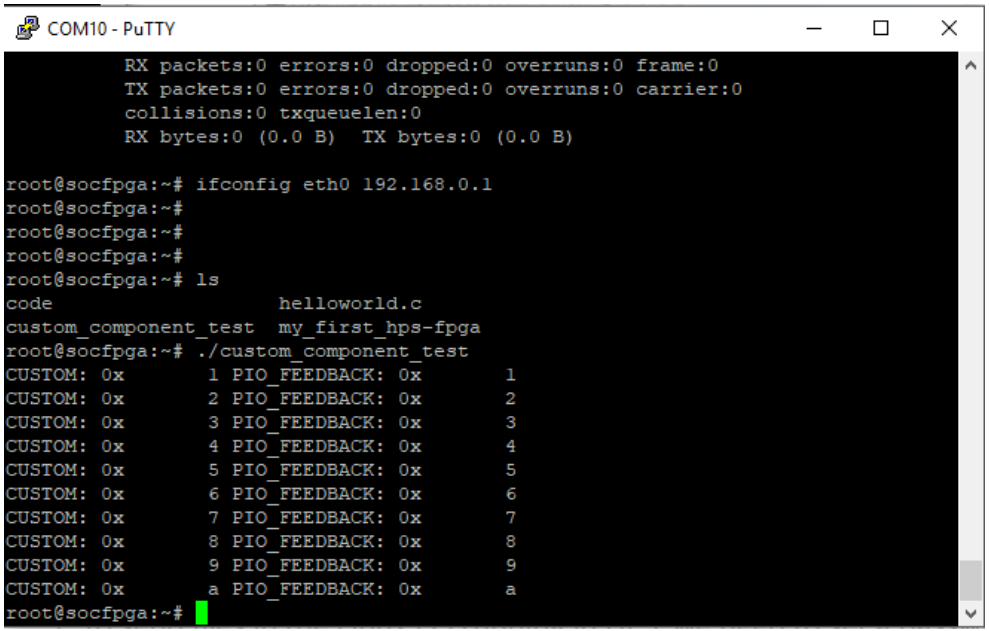
- Connect with HPS using
PuttyorMobaXterm. Then change the permission typingchmod 777 custom_component_testand type./custom_component_testto execute the program. It will generate an output like in the follow figure. You'll see that the custom component and PIO is sending back the data provided from HPS code (0 to 9) incrementing once (1 to a).
(Sorry this picture is a little old, your output will be a little different)
References
- Descriptions of mmap command.https://en.wikipedia.org/wiki/Mmap
- Descriptions of U-Boot command. http://www.denx.de/wiki/publish/DULG/to-delete/UBootCmdGroupMemory.html
- Discussions on multi-port/multi-register slaves. https://www.altera.com/support/support-resources/design-examples/intellectual-property/embedded/nios-ii/exm-avalon-memory-slave.html